

 Click it and Unblock the Notifications

Latest Updates
-
 Venezuela Earthquake: Google Warned Millions: Here's How to Make Sure It Warns You Too
 -
 Priyanka Chopra's Cannes Lions 2026 Looks Cost Over ₹3.6 Lakh; Here's What She Wore
 -
 The Monsoon Fever: A Doctor's Guide To Knowing When Rest Isn't Enough
 -
 Throwback Thursday: Revisiting Satish Shah's Most Unforgettable Characters On His 75th Birth Anniversary
 -
 Why Shigella Spreads Quickly During the Monsoon Season, Expert Explains
 -
 Authentic Punjabi Taste: Pindi Chole Recipe
 -
 Karisma Kapoor Turns 52: The 90s Icon Redefines Beauty With Dadi Ke Nuskhe And Fitness Without Extreme Diets
 -
 GTA 6 Pre-Orders Are Finally Live — Here's Everything That's New This Time Around
 -
 Gayatri Jayanti 2026: Significance Of Ved Mata, Gayatri Mantra, Rituals And Rare Nirjala Ekadashi Alignment
 -
 Samantha Ruth Prabhu Announces Pregnancy at Maa Inti Bangaaram Success Meet


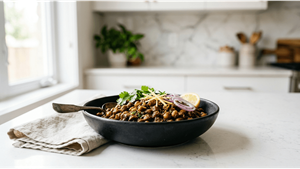
Paniyaram Recipe: Crispy Outside, Soft Inside Perfection
Are you looking for the perfect evening snack that everyone will love? This Paniyaram recipe creates a dish with a golden, crispy crust and a cloud-like interior. Many people struggle to get the texture just right at home. Often, the centers stay raw or the outsides burn too quickly. We have solved these common problems with a simple, fail-proof method.
Many home cooks wonder how to make this delicious veg snack like a professional chef. The secret lies in the batter consistency and the temperature of your pan. In this guide, we reveal the exact techniques used in top South Indian restaurants. You will learn how to master the Paniyaram Recipe Crispy Soft balance perfectly every single time.

Paniyaram is a versatile dish that works for breakfast, snacks, or even a light dinner. It is a fantastic way to use leftover idli or dosa batter. However, we will show you how to enhance that batter for the best results. Adding a few fresh ingredients transforms a simple base into a gourmet treat.
The texture of a perfect Paniyaram is truly unique in the world of snacks. It offers a satisfying crunch that gives way to a soft, spongy middle. This contrast is why children and adults alike find them so addictive. Follow our detailed steps to bring this restaurant-quality experience into your own modern kitchen today.
Why Everyone Is Talking About This Paniyaram Recipe
This version of the recipe has gained popularity because it focuses on flavor layers. We do not just use plain batter for these golden dumplings. Instead, we incorporate a tempered mix of spices and fresh vegetables. This adds a wonderful crunch and a burst of savory flavor in every bite.
The cooking technique we share ensures that the heat reaches the center evenly. Most recipes fail because they use high heat, which chars the exterior immediately. Our method uses a specific heat management strategy. This allows the batter to rise beautifully while forming a thick, protective crust on the outside.
Another reason this recipe is a favorite is its health profile. It is a fermented veg snack that is easy on the digestive system. Since it uses very little oil compared to deep-fried snacks, it is much healthier. You get all the satisfaction of a fried treat without the heavy grease.
Finally, the fermentation process creates a natural tanginess that pairs well with chutneys. This recipe explains how to balance that tang with the sweetness of onions. The result is a complex flavor profile that feels sophisticated. It is the ultimate comfort food for any time of the year.
Paniyaram Recipe at a Glance
| Detail | Information |
|---|---|
| Prep Time | 20 Minutes (plus 8 hours fermentation) |
| Cook Time | 20 Minutes |
| Total Time | 8 Hours 40 Minutes |
| Servings | 4 People |
| Difficulty | Medium |
| Cuisine Type | South Indian |
| Meal Type | Snacks |
| Calories (approx) | 250 kcal per serving |
Ingredients You'll Need for Paniyaram
Gather these fresh ingredients to ensure your Paniyaram has the best taste and texture. High-quality rice and lentils make a significant difference in the final result. Using fresh vegetables will also provide a better crunch and brighter color to the dish.
| Category | Ingredient | Measurement |
|---|---|---|
| Main Ingredients | Idli Rice | 2 Cups |
| Main Ingredients | Urad Dal | 1/2 Cup |
| Main Ingredients | Fenugreek Seeds | 1/2 Teaspoon |
| For the Spice Mix | Finely Chopped Onion | 1 Large |
| For the Spice Mix | Green Chilies | 2-3 Pieces |
| For the Spice Mix | Ginger (Grated) | 1 Inch |
| For the Spice Mix | Mustard Seeds | 1 Teaspoon |
| For the Spice Mix | Curry Leaves | 1 Sprig |
| Optional Garnish | Fresh Coriander | 2 Tablespoons |
| Optional Garnish | Grated Carrot | 1/4 Cup |
How to Make Paniyaram Step by Step
Prep Phase
- Wash the rice and urad dal thoroughly under running water. Soak them with fenugreek seeds for at least five hours to soften.
- Grind the soaked mixture into a smooth, thick batter using a blender. The consistency should be slightly thicker than regular dosa batter.

Cooking Phase
- Heat a small pan with a teaspoon of oil for the tempering process. Add mustard seeds, curry leaves, and green chilies until they start to splutter.
- Add chopped onions and ginger to the pan and sauté until translucent. Do not brown the onions as they should remain sweet and soft.
- Fold this tempered spice mix and grated carrots into the fermented batter. Season the mixture with salt and mix gently to keep the air bubbles.
- Place the Paniyaram pan on medium heat and grease each mold with oil. Using a cast iron pan will provide the best crispy exterior.
- Pour the batter into each mold until they are three-quarters full. This allows space for the Paniyaram to rise and expand while cooking.
Finishing Phase
- Cover the pan with a lid and cook for three minutes. Use a wooden skewer to flip each ball once the edges turn golden.
- Cook the other side without a lid until it becomes equally crispy. Remove them from the pan and serve immediately while they are hot.

Pro Tips for Veg Paniyaram Recipe Crispy Soft Recipe
- Most common mistake: Using a cold pan leads to the batter sticking to the molds. Always ensure the pan is preheated well before adding any oil or batter.
- Secret technique: Add a pinch of baking soda if your batter has not fermented well. This ensures you still get that signature soft and spongy interior texture.
- Storage tip: You can store the unseasoned fermented batter in the fridge for three days. Only add the vegetables and tempering just before you are ready to cook.
- Variation suggestion: For a sweet version, add jaggery and cardamom to the batter instead of salt and spices. These sweet dumplings are a popular treat for children.
- Serving suggestion: Serve these hot with a side of spicy kara chutney or peanut chutney. The heat of the chutney complements the mild flavor of the Paniyaram.
Make This Paniyaram Tonight
There is nothing quite like the smell of fresh Paniyaram cooking in the kitchen. This recipe is a wonderful way to bring traditional flavors to your modern dinner table. Your family will appreciate the effort you put into creating this crispy and soft snack. It is perfect for rainy days or busy weekday evenings alike.

Don't be afraid to experiment with different vegetable fillings to make it your own. Whether you like it spicy or mild, this base recipe remains a reliable favorite. Save this recipe and share it with someone who needs it!