Just In
- 6 hrs ago

- 15 hrs ago

- 17 hrs ago

- 18 hrs ago

Don't Miss
- Education
 JEE Main Result 2024 Out, Telangana's 15 Toppers Shine, Check Statewise List of 56 Candidates with Perfect 100
 - Sports
 Who Won Yesterday's IPL Match 40? DC vs GT, IPL 2024 on April 24: Delhi Capitals Clinch High-Scoring Thriller At Kotla
 - News
 Mangalsutra Row: Did Indira Gandhi Donate Gold During The 1962 War? The Facts Behind Priyanka's Claim
 - Movies
 Kota Factory 3 OTT Release Date, Platform: When Will Jitendra Kumar's Web Series Premiere On Netflix?
 - Travel
 Escape to Kalimpong, Gangtok, and Darjeeling with IRCTC's Tour Package; Check Itinerary
 - Finance
 DCB Bank Q4 Results: PAT Grew 9% To Rs 156 Cr, NII Jumps 4.5%; Dividend Declared
 - Technology
 OPPO Find X7 Ultra Camera Deep-Dive: Pushing the Boundaries of Photography on a Smartphone
 - Automobiles
 Aston Martin Vantage Launched In India At Rs 3.99 Crore
Kim Kardashian & Kylie Jenner Teach You How To Ace The Wet And Glossy Eye Make-up Look
The beauty industry is ever-changing. The beauty trends change in the blink of an eye, must father than we can fathom. While some beauty trends are just over-hyped, there are some that fascinate us quite a lot. These trends become even more fascinating when your favourite celebrity is wearing them. The wet and glassy eye look is one such trend.
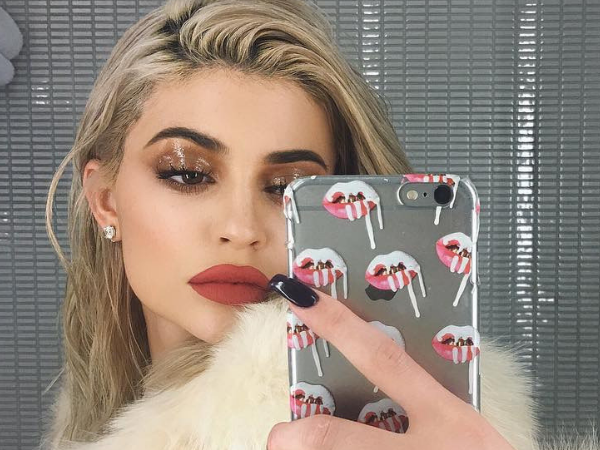
While Kim Kardashian graced the MET Gala this year with a mind-blowing wet look, Kylie Jenner has long been a love of the glossy eye look trend. During the launch of her new make-up collection, the 'Soo Fire Collection', Kim Kardashian posted some wet eye looks on her Instagram page and we are hooked.

Let's take inspiration from these two divas and learn how to ace the wet and glossy eye look. And if you admire this glossy look as much as we do, here are Kim and Kylie's stunning wet eye looks recreated for you in an easy to follow tutorial. Take a look and give it a try.
Kim Kardashian's Glam Wet Look
What you need
- Primer
- Illuminating foundation
- Concealer
- Eyebrow pencil
- Black eyeliner
- Copper eyeshadow
- Burnt orange eyeshadow
- Loose silver glitter
- Glitter glue
- Clear gloss
- Bronzer
- Contour
- Peach blush
- Chocolate brown lip liner
- Nude brown glossy lipstick
- Mascara
- Fluffy eyeshadow brush
- Flat eyeshadow brush
- Blush brush
- Bronzer brush
- Small contour brush
- Beauty blender
- Setting powder
- Setting spray
Steps to recreate the look
- Take a small amount of primer on your fingertips. Using dabbing motions, apply the primer on the T-zone of your face. Let it get absorbed into your skin for a couple of minutes.
- Apply the foundation on your face and blend it in using the damp beauty blender.
- To conceal the dark circles and highlight the under-eye area, apply the concealer in an inverted triangle shape under your eyes and blend it in using the same damp beauty blender.
- Immediately set your concealer with some setting powder. This prevents the concealer from creasing.
- Dip a bronzer brush in the bronzer, tap off the excess and apply it on your forehead, cheekbones and jawline.
- Take a small blending brush, dip it in the contour and use it to contour the bridge of your nose. Use light hand while contouring your nose.
- Apply the blush on your cheekbones using the blush brush.
- Define and fill in your eyebrows using the eyebrow pencil.
- Apply some concealer on your eyelids. This works as your eyeshadow base.
- Now take the copper eyeshadow on the fluffy brush and apply the eyeshadow on your crease. Blend it well to remove the harsh edges. Drag the eyeshadow down to your lower lashline as well.
- Now take the rusted brown eyeshadow on the fluffy brush and apply it all over your lid. Blend well. Drag the eyeshadow down to your lower lashline as well.
- Next, take some concealer on the flat eyeshadow brush and pack it at the centre of your lid.
- Apply the glitter glue over the applied concealer.
- Spritz the flat brush with some setting spray, dip it in the glitter glue and apply it on the centre of the lid.
- Apply the clear gloss all over your lid to give it that wet and glossy look.
- Line your upper lash line using the eyeliner.
- Tightline your eyes and apply the eyeliner on your lower waterline as well.
- Apply a coat of mascara on your eyelashes. Wait for it to dry down before moving in with another coat of mascara.
- Line your lips using the lip liner.
- Now apply the lipstick on your lips.
- Spritz some setting spray on your face to finish off the look.
Kylie Jenner's Coppery Mocha Wet & Glossy Look
What you need
- Primer
- Semi-matte foundation
- Concealer
- Eyebrow pencil
- Black eyeliner
- Mocha brown eyeshadow
- Metallic copper eyeshadow
- Clear gloss
- Pink blush
- Burnt orange lipstick
- Mascara
- Golden highlighter
- Fluffy eyeshadow brush
- Flat eyeshadow brush
- Blush brush
- Beauty blender
- Setting powder
- Setting spray
Steps to recreate the look
- Apply the primer on the T-zone of your face. Let it sink into your skin for a few minutes.
- Apply the foundation on your face and blend it in using the damp beauty blender. This helps to provide an even tone to your skin.
- Apply the concealer under your eyes to highlight the area. Set the concealer using the setting powder to prevent it from creasing.
- To add a natural flush to your face apply the blush on your cheekbones.
- Using the eyebrow pencil define and fill in your eyebrows.
- Apply the concealer on your eyelids and blend it in using your fingertips.
- Take the mocha eyeshadow on the fluffy brush and apply it all over your crease. Blend the edges well.
- Take the copper eyeshadow on the flat brush and pat it all over your lid.
- Top it off with some clear gloss to give it the glossy look.
- Tightline your eyes.
- Apply mascara to your eyelashes.
- Apply the lipstick to your lips.
- Next, apply the highlighter on the tip and bridge of your nose.
- To make the make-up last the entire day spray some setting spray on your face.
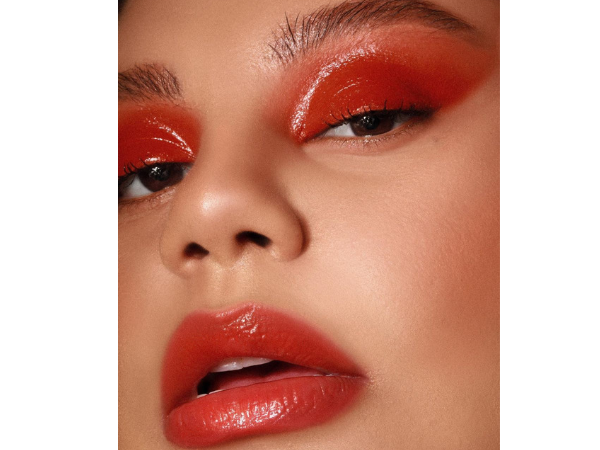
Apart from these stunning make-up looks, Kim Kardashian recently posted on Instagram a gorgeous 'wet fire' look. The look was breathtaking and we think we'll love to recreate it. So, here is the liquid fire look decoded for you.
The Wet Liquid Fire Look
What you need
- Primer
- Illuminating foundation
- Blush
- Eyebrow pencil
- Golden highlighter
- Concealer
- Rusted orange eyeshadow
- Clear gloss
- Orange lip gloss
- Mascara
- Black eyeliner
- Soft pink blush
- Transparent sticky tape
- Beauty blender
- Fluffy eyeshadow brush
- Blush brush
- Setting spray
Steps to recreate the look
- We'll start by prepping the face. Apply some primer on the T-zone of your face. Blend it in using dabbing motions.
- To provide an even tone to your face, apply the foundation on your face and blend well using the damp beauty blender.
- Take the blush on the blush brush, tap off the excess, smile a little and apply the blush to the bulged-out cheekbones.
- Use the eyebrow pencil to fill in your eyebrows.
- Apply the sticky tape from the end of your eyes towards the end of your eyebrows in an angled manner.
- Moving on to the eyes, apply the concealer all over your lid. Use your fingertips to blend it in. This works as your eyeshadow base and helps to transfer the colour with more intensity.
- Take the orange eyeshadow on the fluffy brush and apply it all over your lip. Apply the eyeshadow over your crease till your eyebrow line. Also, extend it a little more towards the outer corner of your eyes.
- You can further layer the eyeshadow until you get the desired intensity.
- Top if off with some clear gloss to add that glossy look to it.
- Use the highlighter to highlight the high points of your face. These are your cheekbones, the tip and bridge of your face and your cupid's bow.
- Lastly, apply the lipstick on your lips.
- To set the make-up in place, spritz some setting spray on your face.
-
 fashionLACMA Art + Film Gala 2022: Kim Kardashian, Billie Eilish, Kendall Jenner, And Others Ace Glitzy Style
 -
 women fashionKim Kardashian Birthday Special: Reality TV Star's Desi Outfits To Inspire Your Ethnic Diwali Look
 -
 make up tipsKylie Jenner’s Everyday Makeup Guide: 7 Steps And Just 10 Minutes
 -
 hair careWhat Is 'Liquid Hair,' And How To Get The Glossy-Shiny Hair At Home
 -
 fashion trendsMET Gala 2022: The 15 Most Iconic Celeb Outfits From Fashion's Biggest Night In New York
 -
 fashion trendsYear Ender 2021: How Bernie Sanders, Kim Kardashian, Zendaya, Lady Gaga Made Fashion Headlines
 -
 fashion trendsMet Gala 2021: Kim Kardashian’s Outfit Has Kanye West Connection; Here’s Also How Kareena Kapoor Reacted
 -
 make up tipsKim Kardashian’s Dramatic And Glam Makeup Looks Are Sure To Drive Away Your Monday Blues
 -
 make up tipsKim Kardashian Goes Creative With Metallic Strip And Flaunts Brunette Makeup Look In The Latest Pictures
 -
 women fashionInstagram Beauty Looks Of The Week: Alaya F, Taapsee Pannu, Urvashi Rautela And More
 -
 women fashionInstagram Beauty Looks Of The Week: Anushka Sharma, Sania Mirza, Kourtney Kardashian And More
 -
 women fashionKim Kardashian Once Again Spruces Up Her Hair Colour And This Time It's Blazing Red


 Click it and Unblock the Notifications


