



 Click it and Unblock the Notifications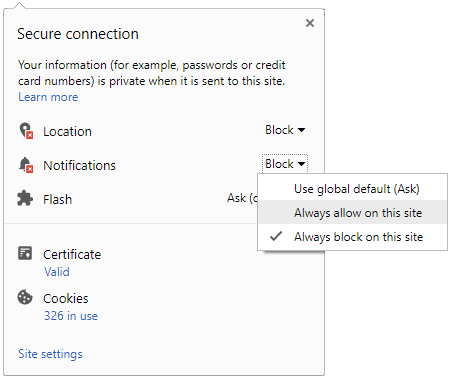


Latest Updates
-
 Deepika Padukone Wears ₹90,000 Gold Kurta Set As Ranveer Singh, Daughter Dua Twin For Baby Devi’s Name Reveal
 -
 Women, Menopause And Bone Health: Doctor Explains Why Osteoporosis Risk Rises After 40
 -
 Can Breast Cancer Be Detected Before Symptoms Appear? A Doctor Explains The Role Of Screening
 -
 Papankusha Ekadashi 2026: October 21 Or 22? Know The Correct Date, Tithi And Significance
 -
 OTT Releases This Week (October 19–25): New Movies And Series On Netflix, Prime Video, JioHotstar And Zee5
 -
 Police Commemoration Day 2026: Know The History, Significance And Programmes Planned Across India This Year
 -
 Deepika Padukone And Ranveer Singh Announce Second Daughter’s Name On Dussehra, Share Family Photo
 -
 Who Was Karthik Sabesh? Tamil Actor Passes Away At 37, Days After Uncle And Composer Deva’s Death
 -
 Who Is Ravleen Varghese? Meet The First Malayali Model To Walk The Victoria’s Secret Runway
 -
 World Osteoporosis Day 2026: A Minor Fall, A Major Fracture — Doctor On Why Older Adults Should Be Careful


Gujiya Recipe: How To Make Mawa Gujiya At Home
The gujiya is an authentic sweet that is made during most festivals. It is a flaky deep-fried dumpling with a sweet filling inside. Here is a step-by-step procedure along with images and a video.

Gujiya is a traditional North Indian sweet recipe that is prepared for many festivals or in general for all functions. The gujiyas are deep fried pastries with a sweet filling inside. It is also called karanji; the only difference being the filling. Gujiya is also made in South India with a coconut-jaggery filling and is called kajjikayallu or karjikai.
The mawa/khoya gujya is crisp and flaky on the outside and contains a filling made from khoya, sooji, sugar and dry fruits. The gujiya is a tedious and time-consuming delicacy and the important thing is to get the dough perfectly right. It is a long procedure and hence must be planned meticulously, before making this sweet at home.
If you are keen on preparing this delicious sweet at home, continue reading the step-by-step procedure along with the images and a video on how to make mawa gujiya.
GUJIYA RECIPE VIDEO

Recipe By: Priyanka Tyagi
Recipe Type: Sweets
Serves: 12 pieces
-
Ghee - 5 tbsp
All purpose flour (maida) - 2 cups
Salt - 1/2 tsp
Water - 1/2 cup
Semolina (sooji) - 1/2 cup
Khoya (mawa) - 200 g
Chopped cashew nuts - 1/2 cup
Chopped almonds - 1/2 cup
Raisins - 15-18
Powdered sugar - 3/4th cup
Cardamom powder - 1/2 tsp
Oil for frying
Gujiya mould
-
1. Take maida in a big bowl and add 3 tablespoon of ghee to it.
2. Mix well and then add 1/4th cup of water, little by little, to knead it into a slight stiff dough.
3. Add 2 to 3 drops of ghee and knead again.
4. Cover it with a moist kitchen cloth and let it rest for 30 minutes.
5. Meanwhile, pour sooji in a heated pan and dry roast it on medium flame, till it turns light brown. Keep it aside for it to cool down.
6. Then, add khoya to a heated pan.
7. Add half a teaspoon of ghee and stir well.
8. Stir continuously to avoid burning and cook until the khoya leaves the sides of the pan and starts to collect in the centre.
9. Remove it off the stove and allow it to cool down completely.
10. Pour half a tablespoon of ghee to a heated pan.
11. Add the chopped cashew nuts, almonds and raisins to it.
12. Stir well till the dry fruits are roasted.
13. Remove it off the stove and allow it to cool down properly.
14. Take the cooled khoya in a bowl and add the roasted sooji to it.
15. Further, add the roasted dry fruits and cardamom powder to it. Remember, all the ingredients of the filling should be cooled completely before you add sugar.
16. Add powdered sugar to it and mix thoroughly.
17. Grease your hands with oil.
18. Take a little of the dough and roll it between your palms to get a smooth round ball and shape it like a peda.
19. Roll the dough into flat pooris using a rolling pin.
20. Meanwhile, grease the gujiya mould with oil.
21. Place the flat dough poori in it.
22. Add the khoya mixture as a filling and apply water to all sides of the dough, so that it seals properly.
23. Close the mould and press the sides of it.
24. Remove the excess dough and add it to the remaining dough.
25. Press the sides again and carefully open and remove the gujiya out of the mould.
26. Cover the gujiya with a cloth.
27. Meanwhile, heat oil in a deep-bottomed pan on a medium flame for frying.
28. You can test if the oil is of the right temperature by taking a little dough and dropping it into the oil. If it immediately floats on top instead of sinking, it means that the oil is hot enough.
29. Gently put a few pieces of the gujiya to fry on a medium flame.
30. Fry them until they turn golden light brown and carefully flip them over to cook on the other side. (Each gujiya set might take about 10-15 minutes to cook.)
31. Once done, transfer them on to a serving plate.
- 1.Add just enough water while making the dough to get a stiff, tough dough. It should not be too sticky.
- 2.The dough must be covered with a moist cloth to avoid it from drying.
- 3.The sooji must be roasted until the raw smell of the sooji is gone.
- 4.While rolling the dough flat with the rolling pin, keep the remaining dough covered. If not, it might turn dry.
- 5.The size of the dough rolled must be an inch bigger than the mould. This allows it to get a proper shape of the gujiya.
- 6.Make sure you don't add too much filling, otherwise the gujiya might break while frying.
- 7.Water must be added to the edges of the dough before closing the mould to seal it properly.
- 8.This sweet can be made with other fillings as well.
- 9.It can also be dipped in sugar syrup after frying.
- Serving Size - 1 piece
- Calories - 200
- Fat - 8 g
- Protein - 2 g
- Carbohydrates - 30 g
- Sugar - 18 g
- Fibre - 1 g
STEP BY STEP - HOW TO MAKE GUJIYA
1. Take maida in a big bowl and add 3 tablespoon of ghee to it.


2. Mix well and then add 1/4th cup of water, little by little, to knead it into a slight stiff dough.


3. Add 2 to 3 drops of ghee and knead again.

4. Cover it with a moist kitchen cloth and let it rest for 30 minutes.


5. Meanwhile, pour sooji in a heated pan and dry roast it on medium flame, till it turns light brown. Keep it aside for it to cool down.


6. Then, add khoya to a heated pan.

7. Add half a teaspoon of ghee and stir well.

8. Stir continuously to avoid burning and cook until the khoya leaves the sides of the pan and starts to collect in the centre.


9. Remove it off the stove and allow it to cool down completely.

10. Pour half a tablespoon of ghee to a heated pan.

11. Add the chopped cashew nuts, almonds and raisins to it.


12. Stir well till the dry fruits are roasted.

13. Remove it from the stove and allow it to cool down properly.

14. Take the cooled khoya in a bowl and add the roasted sooji to it.


15. Further, add the roasted dry fruits and cardamom powder to it. Remember, all the ingredients of the filling should be cooled completely before you add sugar.


16. Add powdered sugar to it and mix thoroughly.


17. Grease your hands with oil.

18. Take a little of the dough and roll it between your palms to get a smooth round ball and shape it like a peda.

19. Roll the dough into flat pooris using a rolling pin.

20. Meanwhile, grease the gujiya mould with oil.

21. Place the flat dough poori in it.

22. Add the khoya mixture as a filling and apply water to all sides of the dough, so that it seals properly.


23. Close the mould and press the sides of it.


24. Remove the excess dough and add it to the remaining dough.

25. Press the sides again and carefully open and remove the gujiya out of the mould.


26. Cover the gujiya with a cloth.

27. Meanwhile, heat oil in a deep-bottomed pan on a medium flame for frying.

28. You can test if the oil is of the right temperature by taking a little dough and dropping it into the oil. If it immediately floats on top instead of sinking, it means that the oil is hot enough.

29. Gently put a few pieces of the gujiya to fry on a medium flame.

30. Fry them until they turn golden light brown and carefully flip them over to cook on the other side. (Each gujiya set might take about 10-15 minutes to cook.)


31. Once done, transfer them on to a serving plate.


 Continue with Google