

 Click it and Unblock the Notifications

Latest Updates
-
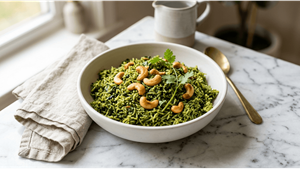 Iron Rich Healthy Meal: Delicious Palak Rice Recipe
 -
 Mid-Year Reset: Fitness Resolutions That Failed By June? Here's How To Restart Without Guilt
 -
 Who Was Ketan Agarwal? The 26-Year-Old Pune Businessman At The Centre Of The Lohagad Fort Death Investigation
 -
 July 2026 Calendar: Every Important Day, Event, And Observance You Need To Know
 -
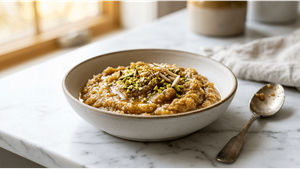 Moong Dal Halwa Recipe: Your Guide to this Rich Festive Sweet
 -
 Sitting Too Long, Stressed Too Often: Urban India's Growing Diabetes Risk
 -
 July 2026 Bank Holidays In India: Complete List Of State-Wise And Nationwide Closures
 -
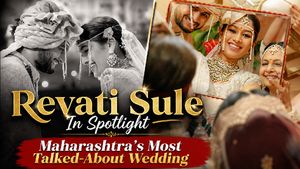 Who Is Revati Sule? The Star-Studded Wedding That Connected Two Influential Political Families
 -
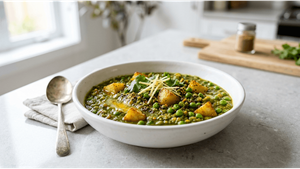 Nimona Recipe: A Taste of UP Traditional Curry
 -
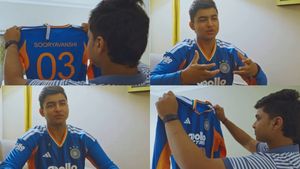 From Bihar To Blue: How Vaibhav Sooryavanshi Earned The India Jersey At 15


Top 7 Taylor Swift Hairstyles To Inspire The Girl In You
You don't have to be a celebrity to look like a celebrity, don't you agree? With the help of internet tutorials and articles online, almost all women can do their own makeup and hairdos.
We tend to get inspiration from a lot of singers and actors, and today we will be talking about the most gorgeous superstar Taylor Swift. Her sense of style is simply awesome, like the way she wears her hair is simple but yet classy. She has not only made her mark in the music industry but also in the fashion industry. Every time she attends a red-carpet event, she's always on her best makeup, clothes and hairstyle.

Why Do You Need To Change Your Hairstyle?
It's fun to try out different hairstyles rather than just simply making it into a bun. And you wouldn't want to have the same look that you had since high school, right? Different hairstyles will bring out the flattering angle of your face and even your eye color. So, if you've been wanting to try out from a long time but were hesitant, then don't be, because today, we have listed 7 super easy and stylish hairstyles that our popstar diva has tried and rocked it. So, ladies, you can give it a try because below we've provided you with a step by step guide. Choose any and try it out or better try out all seven of them. So, without further ado, let's get into it, shall we?
Here Are Few Taylor Swift Hairstyles To Inspire You:
1. Fringe:
Fringe or "Bangs" is a great way to spice up your look. This hairstyle will help frame your face with a fashionable flair. Taylor Swift flaunts her fringe with grace and style. And the best part about this hairstyle is you can easily do it at home.
• Wash, condition and dry your hair. Now section off the triangle of the hair from the top centre of your head to the outside corner of your eyebrows.
• Tie the rest of your hair in a ponytail as this will help you avoid making mistakes and chopping off unintended hair.
• Now, comb the section of your hair evenly in front of your face. This will give you an idea as in how short you want your fringe to be.
• Use a styling scissors, preferably a small one.
• Divide your fringe into horizontal rows of not more than one inches. Hold the scissors upright and make vertical, minimal snips. Continue doing this till you get your desired length.
• Shake your hair and part it. Tada and you're done.
2. Messy Bun:
Taylor Swift had carried this look perfectly in one of the red-carpet events and it just looked amazing on her. Here's a simple way to mimic this look:
• Flip your head upside down and pull your hair into a loose ponytail. Do not comb your hair, just use your fingers to comb your hair.
• Now, twist your hair and spin it around the base of the ponytail. Wrap it around until you get a bun and make sure you leave the end tail of your hair.
• Secure your hair with bobby pins and elastic band. And we're done!
3. Flicks:
Taylor Swift looks very retro in this look and she has charmed and swayed them every time she performed on stage.
• Comb the crown area and then push back the rest of your hair into a ponytail.
• Now evenly comb out your bangs in front of your face.
• Now grab your bangs and make sure it's even. Tie the rest of your hair into a high ponytail.
• Comb your bangs again, then grab it, flip it over and with your other hand hold it in place.
• Comb the bottom section out and cut diagonally downwards with the help of a professional scissors. Make sure you cut only half an inch of your hair.
• Repeat again until you are happy with the length of your bangs.
• Now comb your bangs in a position you want to keep it. Look for uneven sections.
• If you've missed out certain section, simply trim them and create a neat diagonal line.
• Once you are happy with your look, you can style it with a flat iron or a curling iron.
4. Fishtail Pony:
Simple yet a beautiful everyday look if you have a long hair. This look has been liked by a lot of reviewers and Taylor definitely rocks in this one.
• Divide your hair into two even sections.
• Take a thin section of hair from the left side. It should not be thicker than 0.5 inches.
• Now, cross the thin strand of hair across the left section.
• Tuck the thin strand under the right section so that it becomes a part of the right section.
• Take a thin strand from the right section and then tuck it in to the right section of the hair.
• Now repeat this until you reach the end of your hair.
• Tie it with a rubber band.
5. Bob cut:
This cut can be done on short hair and it looks very neat and professional.
• Divide your hair into three sections, one section at the back and one section at the either side of the head.
• Gently cut the back section off, cut it square starting from the middle and moving towards the edge. Once done, make sure you check so that it's even and straight.
• Take the other section of the hair and repeat the same process for the last section as well.
• Continue doing this until you get a classic bob cut.
6. Low Side Bun:
This hairstyle adds grace and beauty to your personality.
• Part your hair and comb most of your hair on the side. (any side is fine)
• Now gather your hair and tie it in to a low ponytail.
• Take a small amount of hair and hold them between your thumb and forefinger.
• Now back comb that hair outward.
• Bunch up the back combed hair and fix it in the middle of the ponytail with the help of a bobby pin.
• Repeat this process until you're done with all the strands.
• Now secure the bun with a hairspray so that it doesn't fall off.
7. Beehive- Cinderella Bun:
This is a simple style but it gives you that princess look.
• Divide your hair into two sections (front and back). If you have a fringe then divide that with the rest of the hair.
• Brush your hair into a high ponytail and then put a sock bun on top of it.
• Wrap the hair around the sock bun and secure it with bobby pins.
• Now comb your fringe in which ever side you want it to be on.
• And then it's done.