



 Click it and Unblock the Notifications


Latest Updates
-
 OTT Releases This Week (Sept 21-27): What To Watch Across Netflix, JioHotstar, Prime Video, ZEE5 And SonyLIV
 -
 CGM vs Finger-Prick Test: Which Blood Sugar Monitoring Method Is Better?
 -
 Anant Chaturdashi 2026: Why The Anant Sutra Has 14 Knots And How The Festival Is Linked To Ganesh Visarjan
 -
 ‘Welcome’ Actor And Comedian Mushtaq Khan Passes Away After Battling Cancer
 -
 World Lung Day 2026: Date, Theme, History, and Significance
 -
 Who Is Adarsh Balak? The 1970s Indian Poster Boy On The London Runway
 -
 Hurun India Rich List 2026: Who Are India's 10 Richest And How Much Are They Worth?
 -
 Who Is Jay Singh Rathore? The X User Accused Over A Rs 1.5 Lakh Appeal
 -
 Eye Injury at Home: The Common Things Parents Should Never Put in a Child's Eye
 -
 Ganesh Visarjan 2026: What To Do With Puja Flowers And Nirmalya


Soft Homemade Pita Bread Recipe for a Perfect Breakfast

Making bread at home often feels like a giant task. Many home cooks worry about the dough rising. They also fear the bread will turn out hard. This Soft Homemade Pita Bread Recipe solves those common problems. You will learn the secret to a soft texture. This recipe is perfect for a fresh breakfast. It is a completely Veg friendly option for everyone.
The magic of this recipe is the steam pocket. Most store-bought bread is dry and quite flavorless. Our version focuses on moisture and high heat. This creates a pillowy bread that stays soft. You do not need fancy equipment to start. A simple skillet and basic ingredients work perfectly. Your kitchen will smell like a professional bakery today.

Many people think the pocket is a mystery. They wonder how the bread separates inside. The secret is the temperature of your pan. High heat turns the moisture into steam quickly. This steam pushes the dough layers apart instantly. It creates a perfect space for your favorite fillings. You can master this technique with a few tries. It is very satisfying to watch.
Starting your day with fresh bread is wonderful. This recipe uses simple pantry staples you already own. You do not need expensive oils or fats. The dough is lean and very healthy for you. It pairs well with eggs or fresh salads. You can even enjoy it with sweet spreads. This versatility makes it a breakfast staple. Let us explore the world of pita bread.
Why should you stop buying plastic bags of bread? Fresh bread has no hidden preservatives or chemicals. You control the salt and the sugar levels. This makes your breakfast much more nutritious. Your family will taste the difference in every bite. The texture is vastly superior to any commercial brand. It is time to reclaim your morning meal.
Why Everyone Is Talking About This Soft Homemade Pita Bread Recipe
This recipe has gained popularity for its amazing texture. Most pita recipes result in a stiff crust. Ours stays flexible and very soft to touch. We use a specific hydration level for the dough. This ensures the bread does not dry out. It remains delicious even after cooling down. That is why home cooks love this version.
The technique used here is very easy to follow. We focus on the resting time of the dough. Allowing the gluten to relax is very important. This makes the rolling process much easier for you. The bread will not shrink back during cooking. You get a consistent shape every single time. It looks like it came from a shop.
Another reason for the hype is the cooking method. You do not need a hot stone oven. A simple heavy skillet works just as well. This makes the recipe accessible to every home. You can make this on a gas stove easily. It takes only a few minutes per batch. Efficiency is a key part of this recipe.
Finally, the flavor of fresh yeast is unbeatable. It provides a subtle tang that balances the flour. This recipe highlights the natural sweetness of wheat. It is a wholesome experience for your taste buds. People are sharing this because it actually works. You will see the beautiful puff in your pan. It is truly a magical cooking moment.
Soft Homemade Pita Bread Recipe at a Glance
| Feature | Details |
|---|---|
| Prep Time | 20 Minutes |
| Resting Time | 90 Minutes |
| Cook Time | 15 Minutes |
| Total Time | 125 Minutes |
| Servings | 8 Pitas |
| Difficulty | Medium |
| Cuisine Type | Middle Eastern |
| Meal Type | Breakfast |
| Calories (approx) | 160 kcal |
Ingredients You'll Need for Soft Homemade Pita Bread
The beauty of this bread lies in its simplicity. You only need five basic ingredients to start. Quality flour makes a huge difference in texture. Make sure your yeast is fresh and active. This will ensure a high rise every time. Follow the measurements closely for the best results. Here is your shopping list for today.
| Category | Ingredient | Measurement |
|---|---|---|
| Main Ingredients | All-Purpose Flour | 3 Cups |
| Main Ingredients | Warm Water | 1.25 Cups |
| Main Ingredients | Instant Yeast | 2 Teaspoons |
| Spice Mix | Fine Sea Salt | 1 Teaspoon |
| Spice Mix | Granulated Sugar | 1 Teaspoon |
| Optional Garnish | Olive Oil | 1 Tablespoon |
| Optional Garnish | Fresh Parsley | 1 Tablespoon |
How to Make Soft Homemade Pita Bread Step by Step
Prep Phase
The prep phase is where the magic starts. You must activate the yeast properly first. Use warm water, not hot or cold water. Hot water will kill the tiny yeast cells. Cold water will make the process too slow. Proper preparation leads to a very soft bread. Take your time with these initial steps.
Cooking Phase
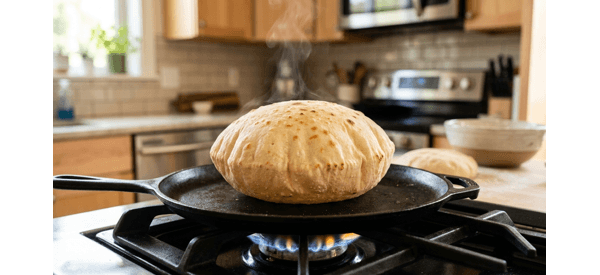
Cooking the bread requires focus and high heat. The pan must be very hot before starting. This creates the steam needed for the pocket. You will see the dough change quickly. It will go from flat to puffed. This is the most exciting part of cooking. Watch the bread carefully to avoid burning.
Finishing Phase
The finishing phase keeps the bread very soft. You must protect the warm bread from air. Cooling them properly is a vital step. This prevents the crust from becoming too hard. Stack them together to trap the residual heat. This steam softens the exterior naturally. Your pita will be perfect for eating.
- Combine warm water, sugar, and yeast together. Let the mixture sit for five minutes. It should become foamy and very bubbly.
- Add the flour and salt to the bowl. Stir until a shaggy dough starts forming. The flour should absorb all the water.
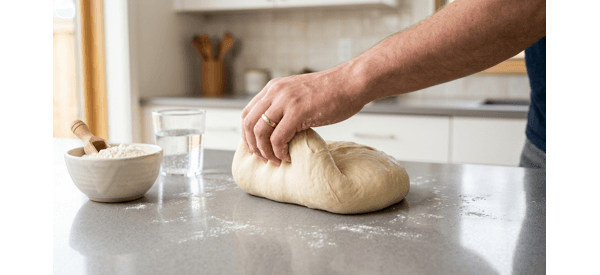
- Knead the dough for ten full minutes. It must be smooth and very elastic. Do not skip this important kneading step.
- Place the dough in a greased bowl. Cover it with a clean damp cloth. Let it rise for about one hour.
- Punch the dough down to release the air. Divide it into eight equal sized balls. Let these balls rest for ten minutes.
- Roll each ball into a flat circle. Keep the thickness at one quarter inch. Ensure the circles are very even throughout.
- Heat a cast iron skillet over high heat. Place one circle in the hot pan. Wait thirty seconds for bubbles to appear.
- Flip the bread and wait for the puff. It should inflate like a small balloon. Remove and wrap in a clean towel.


Pro Tips for Veg Soft Homemade Pita Bread Recipe
- The most common mistake is a cold pan. Ensure the skillet is smoking hot before cooking. This ensures a perfect steam pocket every time.
- Always keep the cooked pitas wrapped in towels. The steam keeps the crust soft and flexible. Never leave them exposed to the cool air.
- You can use half whole wheat flour easily. This adds a nutty flavor and more fiber. Add a little extra water if you do.
- Store leftover pitas in a sealed plastic bag. They will stay fresh for up to three days. Reheat them quickly in a warm toaster.
- For a breakfast twist, brush with melted butter. Sprinkle some sesame seeds or dried herbs on top. This adds a wonderful savory aroma.
Make This Soft Homemade Pita Bread Tonight
You now have the secrets to perfect bread. This Soft Homemade Pita Bread Recipe is a winner. It will transform your breakfast routine completely. Your family will love the soft and fresh taste. You can be proud of your baking skills. It is time to get into the kitchen. Start mixing your dough right now for dinner.

Making bread is a very rewarding hobby to have. You will improve your skills with every batch made. Do not worry if the first one fails. Practice makes your technique much more consistent. You will soon be a master of the puff. Save this recipe and share it with someone who needs it!

 Continue with Google