Just In
- 2 hrs ago

- 9 hrs ago

- 10 hrs ago

- 13 hrs ago

Don't Miss
- Sports
 Pakistan vs New Zealand Playing 11: PAK vs NZ 2nd T20I Team News, Predicted Lineup And Other Details
 - Education
 Exam Pressure Does Not Exist; Studying Punctually is Crucial; Says Aditi, the PSEB 2024 Topper
 - News
 Deputy CM Shivakumar Says BJP Trying To Impose Governor's Rule In Karnataka
 - Movies
 When Karan Johar Revealed Sara Ali Khan And Janhvi Kapoor Once Dated Siblings On KWK 7, Guess Who?
 - Finance
 Reliance, ONGC, Tata, Adanis: Energy Stocks Didn't Get The Memo Of Bears, Up 12% In 30-Days; 10 Stocks To BUY
 - Automobiles
 Suzuki Swift Hatchback Scores 4 Star Safety Rating At JNCAP – ADAS, New Engine & More
 - Technology
 Dell Introduces AI-Powered Laptops and Mobile Workstations for Enterprises in India
 - Travel
 Journey From Delhi To Ooty: Top Transport Options And Attractions
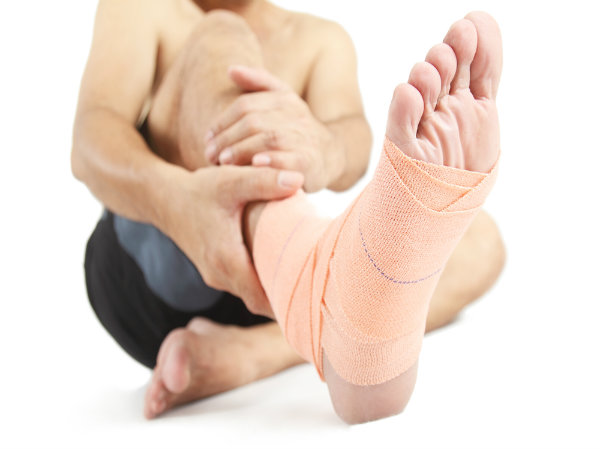
Using A Compression Wrap For Sprained Ankle
Most of have faced the issue of a sprained ankle at least once in our lifetime. You can get your ankle sprained from rolling, twisting or turning your ankle in an awkward manner. This will cause your ligaments to stretch or tear the tough bands of tissue, resulting in stabilising joints and preventing excessive movement[1] .
Depending on the severity of the sprain, the signs and symptoms vary from pain (especially when you bear weight on the affected foot), tenderness when you touch the ankle, swelling, bruising, restricted range of motion, instability in the ankle and a popping sensation or sound at the time of injury [2] .

When forcefully moved out of its normal position, your ankle gets sprained. It can be caused from a fall that causes your ankle to twist, landing awkwardly on your foot after jumping or pivoting, walking or exercising on an uneven surface, and another person stepping or landing on your foot during a sports activity[3] .
Some of the other causes or risk factors that elevate the chance of sprained ankle are uneven surfaces, poor physical condition, prior ankle injury, sports participation and even wearing improper shoes can lead to it. A sprained ankle may even cause complications such as chronic ankle pain, chronic ankle joint instability and arthritis in the ankle joint [4] .
As aforementioned, treatment of sprained ankle depends on the severity of your injury. However, the most common and effective method used for is the usage of a compression wrap or an elastic bandage. A compression wrap helps in reducing the swelling and providing relief to your ankles. It is inexpensive and is available in every drug store. You can apply the wrap on yourself in the case of a sprained ankle [5] . Read on to learn the step-by-step guide for wrapping the bandage by yourself, helping you be independent!
Step-By-Step Guide For Using A Compression Wrap For Sprained Ankle
Step 1: Start at the ball of the foot
Hold one end of the elastic bandage against the ball of your foot, with the tail of the bandage extending past the outside of the foot (and not inside). Keep the tail of the bandage rolled, as it is easier and manageable. For extra support while wrapping, place a gauze pad on either side of the ankle (before wrapping). Horseshoe-shaped padding cut from foam or felt is also used for extra stability [6] [7] [8] .
Step 2: Wrap the top of your foot
Use one hand to hold the end of the bandage against the ball of your foot. Then, bring the bandage over the foot, from outside to inside, and then under the foot for a second wrap. Wrap your foot a total of three times, with each wrap overlapping in half. While tying the loop, maintain the same force or tension as it should not be too tight, but firm. Make sure that each loop of the wrap is lined up evenly, rather than in different directions.

Step 3: Wrap the ankle
After wrapping the top of your foot, bring the bandage over the top of the foot, around the inside of the ankle, behind the ankle to the other side, and back over the instep and under the foot. The elastic bandage should be woven over your ankle and foot so that your heel is exposed.
Step 4: Making the number 8
After the above step, make two more 8s. Each time, it should overlap the bandage by half. Once you are done with making 8s, then the bandage should cover your entire foot and extend up past the ankle. However, smaller feet and legs may not require three full figure 8s with an elastic bandage.
Step 5: Fasten the bandage
Now, stretch the last segment of the bandage (a bit) and use the velcro adhesive or small metal prongs to secure the end of the bandage in place. The wrapping should be devoid of any lumps or bulges and should be comfortable to be worn and used. If the toes on the foot turn white or feel numb or tingly, remove the bandage. It can be worn for a number of hours and during physical activities, or as per the recommendation of the doctor. It should be removed twice a day to allow the ease of blood circulation in your foot.
On A Final Note...
Using a compression bandage helps decrease swelling. With the swelling kept to a minimum, it helps your ankle feel better.
- [1] Serola, R. J. (2014). U.S. Patent No. 8,628,488. Washington, DC: U.S. Patent and Trademark Office.
- [2] McCoy, K. (1992). U.S. Patent No. 5,165,402. Washington, DC: U.S. Patent and Trademark Office.
- [3] Sarpel, U., Jacob, B. P., & Steinhagen, R. M. (2005). Reduction of a large incarcerated rectal prolapse by use of an elastic compression wrap. Diseases of the colon & rectum, 48(6), 1320-1322.
- [4] Degnim, A. C., Miller, J., Hoskin, T. L., Boughey, J. C., Loprinzi, M., Thomsen, K., ... & Cheville, A. L. (2012). A prospective study of breast lymphedema: frequency, symptoms, and quality of life. Breast cancer research and treatment, 134(3), 915-922.
- [5] Tiemstra, J. D. (2012). Update on acute ankle sprains. Am Fam Physician, 85(12), 1170-1176.
- [6] Johnson Jr, G. W. (1995). U.S. Patent No. 5,389,065. Washington, DC: U.S. Patent and Trademark Office.
- [7] Smith, R. W., & Reischl, S. F. (1986). Treatment of ankle sprains in young athletes. The American journal of sports medicine, 14(6), 465-471.
- [8] Johnson Jr, G. W., & McVicker, H. J. (1992). U.S. Patent No. 5,113,877. Washington, DC: U.S. Patent and Trademark Office.
-
 diet fitness10 Common Workout Injuries To Avoid
 -
 wellnessMain Causes For Ankle Swelling
 -
 wellness8 Home Remedies To Get Relief From Heel Pain Naturally
 -
 body careHome Remedies For The Dry Skin On Ankle
 -
 body care14 Home Remedies For Dark Ankle
 -
 wellnessWhat Are The Benefits Of Cold Water Therapy Or Cryotherapy?
 -
 disorders cureSprained Wrist: Types, Symptoms And Treatment
 -
 disorders cureThese Natural Remedies Help To Treat Sprained Ankles
 -
 disorders cureQuick Home Remedies For Sprained Ankles
 -
 diet fitness5 Side Effects Of Exercise
 -
 wellness12 Best Home Remedies For Muscle Sprain
 -
 wellnessWhat Kind Of Heart Pain Is Serious? How Do You Know If Chest Pain Is Heart Pain?


 Click it and Unblock the Notifications


