Just In
- 13 hrs ago

- 14 hrs ago

- 17 hrs ago

- 17 hrs ago

Don't Miss
- Movies
 Pavi Caretaker X Review: Dileep-Led Comedy Drama Directed By Vineeth Kumar Promises To Be Delightful
 - Sports
 Who Won Yesterday's IPL Match 41? SRH vs RCB, IPL 2024 on April 25: Royal Challengers Bangalore End Losing Streak
 - Finance
 Bajaj Group Stock Declares Rs. 60/Share Dividend: Buy Ahead of Record Date On 28 June?
 - News
 MEA Dismisses US Human Rights Report On Manipur As 'Biased And Misinformed'
 - Automobiles
 Royal Enfield Unveils Revolutionary Rentals & Tours Service: Check Out All Details Here
 - Technology
 Elon Musk’s X Is Launching a TV App Similar to YouTube for Watching Videos
 - Education
 AICTE introduces career portal for 3 million students, offering fully-sponsored trip to Silicon Valley
 - Travel
 Escape to Kalimpong, Gangtok, and Darjeeling with IRCTC's Tour Package; Check Itinerary
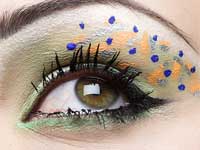
Eye make up (Part 2 )

In the first part of the Eye make up we had seen some special ways of decorating your eyes. In this section we see more ways of making your eyes look beautiful and sensuous.
Design three: Start by applying either of the basic one- or two-color eye-makeup designs mentioned above. Once you have done that, the third shade, an even deeper color than the two previous colors, is added to the back (outside) corner of the lid or in the crease, or over both the crease and the back corner of the lid.
In this design, the lid and under-brow colors are softer and less intense than the color at the back corner of the lid or in the crease. Regardless of where you place this third, darker color, it can be a beautiful deep shade of brown, charcoal, cedar, mahogany, sable, red-brown, slate, chocolate brown, camel, deep taupe, eggplant, or even black.
Application: If you apply the third eye shadow in the crease, the trick is to not get the crease color on the lid, but rather to blend it slightly up into the under-eyebrow area and out onto the temple. A crease defining brush or an angled shadow brush make this step easy. The best look is achieved if you blend the crease color out and up into the full back (outer) corner of the eye, and up onto the back of the brow bone.
When you apply the crease color, be sure to watch the angle of your brush as you blend the color from the crease out and up toward the under-brow area. If you place your color with the brush straight up at a 90-degree angle, you will look like you drew on wings. The softer the angle and the fuller the sweep, the softer the appearance, so be certain you blend out and slightly up from the lid area toward the under-brow area.
Design four: In this design, you again start with the one- or two-color eye-makeup design, then add a darker color to the crease and an even darker color such as black or deepest gray to the back corner of the eye. Shading the back corner of the eyelid involves the arts of placement and blending. Because this area almost always requires a dark color, blending is essential to make it look soft, with no hard edges.
Why bother with a crease color and more shading at the back corner of the eye? The best part of this full eye-makeup design is that it shades, defines, and creates movement by adding a shadow in a curved flowing motion that follows the natural shape of the eye.
Application: Be sure to knock the excess eye shadow off your brush, and apply the color with very small strokes over the back corner of the lid only.
The softer the angle and the fuller the sweep, the softer the appearance, so be certain you blend out and slightly up from the lid area toward the under-brow area.
Remember, the center or fold of the crease area is always the darkest, so start your brush there and blend out in each direction. Start all the way at the front part of the eye area under the front third of the brow, then follow the crease through the center, blending slightly up toward the brow. As you approach the back corner of the eye, begin your movement up and out toward the temple, aiming toward the eyebrow.
Eye-Design Mistakes to Avoid
- Do not over color the eyes; excessive bright colors are distracting, not attractive.
- Do not create hard edges; you should not be able to see where one color stops and another starts. Practice your application and learn to blend well.
- Do not wear bright pink or iridescent pink eye shadows; they make eyes look irritated and tired. Muted or pale pink is an option.
- If you are concerned about making skin look more wrinkled, do not wear shiny eye shadows of any kind because they exaggerate the appearance of lines. If you have smooth, unlined eyelids and prefer a touch of shine, apply it sparingly for subtle shimmer rather than distracting glitter.
- Do not apply lipstick or blush over the eye area; it might sound like a time-saver, but if you have a lighter skin tone, it can make you look like you've been up all night crying. However, bronzing powders can work as eye shadows.
- Do not match your eye shadow to your clothing or your eye color. If you have blue eyes, blue eye shadow makes the blue of your eyes look duller. And complementing your clothing is at best dated; besides, what if you're wearing red or black?
- Avoid eye glosses and other greasy products at all costs. These may look intriguing in photographs, but are more annoying than alluring in real life because they stick, smear and smudge all over the place in a very short period of time.
Eyelining Tips: Line the upper lash line with a dark shade of matte powder eye shadow (wet or dry) applied with an eyeliner brush. You can even use a pencil to draw the fine line on the eyelashes. Use a lighter shade of powder or pencil to line the lower lash line.
Draw a line from the inner to outer corner using one fluid stroke, following the curvature of the eyelid. Do not extend the line past the outer corner of the eye or hug the tear-drop area of the eye. To start, keep the line as thin as possible, and if a thicker line is desired, repeat the process either across the entire lash-line or simply on the outer third of the lid along the lashes.
How thickly can you line the eye? As a general rule, for a classic look, the thickness and intensity of the eyeliner is determined by the size of the lid-the larger the eyelid area, the thicker and softer the eyeliner should be. The smaller the eyelid area, the thinner and more intense the liner should be. If your lid doesn't show at all, forget lining altogether.
What about applying eyeliner in the rim of the eye? There are many reasons why this is not a good idea. The first is that this kind of application smears in a very short period of time. Pencil applied along the rim of the eye usually causes the area to become irritated; after all you are putting a foreign substance next to the mucous membrane of your eye.
Which eyeliner color should you use? For a classic eyeliner application, choose shades of dark brown, gray, or black eye shadow for the upper lid and a softer shade of those-tan, taupe, chestnut, soft brown, soft gray, or soft black-along the lower lashes. Eyeliner is meant to give depth to the lashes and make them appear thicker. If the liner is a bright color or a true pastel, attention will be focused past the lashes to the colored line, as opposed to the more subtle flow of color from dark lashes to dark liner.
Checking
for
Mistakes
After
using
powder
eye
shadow
as
eyeliner,
check
for
drippies
under
the
eye
and
on
the
cheek.
Drippies
are
those
little
powder
flakes
that
fly
off
the
brush
and
land
on
the
cheek.
Knocking
off
the
excess
from
the
brush
every
time
helps
prevent
drippies,
but
there
will
always
be
flakes
that
end
up
where
they
don't
belong.
The
best
way
to
go
after
drippies
is
to
use
your
sponge
and
simply
wipe
them
away
Eyeliner Mistakes to Avoid
- Do not use greasy or slick pencils to line the lower lashes; they smear and smudge.
- Do not use brightly colored pencils or eye shadows to line the eye; they are distracting and look like too much makeup. All you'll see is the color and not your eye.
- Do not extend the eyeliner beyond the corner of the eye.
- Do not make the eyeliner more prominent.
- Do not line the inside rim of the lids, between the lash and the eye itself; it is messy and can be unhealthy for the cornea.
- Do not apply thick eyeliner to small or close-set eyes.
- Do not use eye shadow as eyeliner unless you use the proper brush.
- Do not line the eye with a circle of dark or bright color. Both are too obvious and create an eyeglass-style circle around the eye.
- Do not over blend, spilling your eyeliner onto the skin under the lower lashes; that makes dark circles look worse.
Follow the tips and get beautifully made eyes that will make you look gorgeous.
-
 hair careHair Highlight your dark tresses
 -
 love and romanceHow to make your first date a success?
 -
 love and romanceOnline Romance
 -
 make up tipsHow To Apply Make-Up For An Interview?
 -
 marriage and beyondSide Effects Of Marriages
 -
 decorHome Decorating Tips and Styles
 -
 make up tipsMake-up For Dark Complexion - Part 1
 -
 relationshipWhat Men Hate About Women
 -
 tips tricksHow To Shop For Grocery And Save?
 -
 disorders cureLASIK Eye Surgery
 -
 disorders cureBack Pain
 -
 love and romanceRomantic candle light dinner


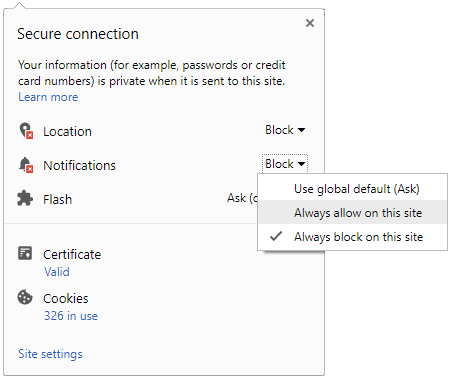
 Click it and Unblock the Notifications


